
If you have ever wondered how professional photographers get that flawless skin look while keeping it looking real, this photo retouching tutorial is exactly what you need. I know it is tempting to just blur everything out, but the secret to high-end work is actually in the texture, and that is where most people get stuck. In this guide, I’m going to show you how to handle skin properly using frequency separation and other professional techniques that don’t destroy the natural details. To keep growing your editing toolkit, you should definitely take a look at our other video courses where we cover all sorts of creative workflows. This lesson is all about balance; I’ll show you how to clean up imperfections and enhance the light on a model’s face so that the final result looks polished but still looks like a real person.
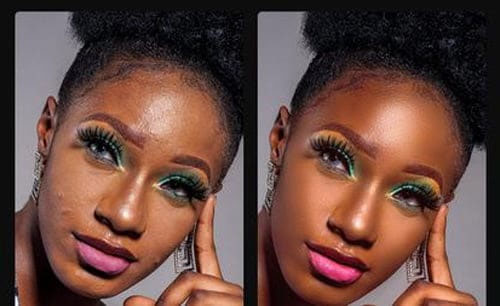
Overview of Photo Retouching Tutorial
The core of this training is a simplified frequency separation process that makes high-end skin work much easier to understand. We start by removing basic blemishes and stains before diving into the more advanced stuff like using the Liquify tool to gently correct shapes and symmetry. I place a huge emphasis on skin texture because keeping that detail is my “golden rule”—if you overdo it, the photo loses its soul. You will learn how to use the Curve tool to bring out the contrast in eyes and lips, making the features pop without looking over-edited. It is a very practical approach designed to train your eye to see the fine details in tones and depth.
We also spend time on the Dodge and Burn technique, which is basically painting with light to add dimension to the model’s face. To wrap everything up, I’ll show you my color grading process to fix skin tones and give the whole image a professional mood. The more you practice these steps, the better your results will be.
Main Features
- A simplified Frequency Separation process for professional skin smoothing.
- Learn how to remove blemishes and stains while keeping natural texture.
- Using the Liquify tool to fix shapes and improve facial symmetry.
- Master the Curve tool to add high-end contrast to the eyes and lips.
- Detailed guide on Dodge and Burn to enhance lighting and facial depth.
- Professional Color Grading techniques to fix and improve skin tones.
- Focus on “Golden Moderation” to avoid the common over-retouched look.
- Tips on training your eye to better see shapes, colors, and shadows.
- Practical lessons that apply to any type of portrait photography.
- Easy-to-follow steps that turn basic photos into high-quality professional edits.
Zip File Password: freegfx4u.com
Conclusion
High-quality retouching is all about knowing when to stop, and this tutorial teaches you exactly how to find that balance. By mastering frequency separation and lighting effects, you can give any photo a professional finish that stands out. Start practicing today and take your Photoshop skills to the next level.